Gimp Panoramas
This guide was written by Akkana Peck, I take no credit.
He has written a plugin for Gimp called | Pandora, however, It only works for Gimp 1.x, 2.0 and I cannot get it to work in Gimp 2.2.
Sometimes a camera lens just isn't wide enough to show what there is to see. You stare at a wide, sweeping vista, but when you look in the camera's viewfinder, it only shows a tiny piece of the view yousee with your eyes.
In this lesson, I'll show you how to shoot multiple photos, then use GIMP to stitch them into a panorama.
SHOOT THE IMAGES
Shooting panoramas means taking a lot of side by side shots that overlap. Start at one end -- I usually start at the far left -- and shoot a picture, then rotate the camera a little to the right (not very much: each image has to overlap with the previous one), shoot another image, and so on.
The process of combining them into one wide panoramic image is usually called "stitching", and you can make the job easier if you keep in mind a few tricks when you're shooting the images:
- Overlap a lot: take lots of images. Overlap helps because all camera lenses have some "warp" at the edges, and trying to overlap two edges that are warped in opposite ways can be challenging. Lots of overlap also means that you'll have more images than you really need, so if some turn out to be not as good, you can discard them without hurting the final image. Overlap at least 1/3 of the frame with the next frame (e.g. the right 1/3 of image 1 is the same as the left 1/3 of image 2), but more is better. I usually overlap at least 50%.
- Keep the camera level. If you have a tripod or a rock or fence to set the camera on, it will make it easier to make the panorama later. If not, just try hard to keep the horizon level in the viewfinder. GIMP can rotate images after the fact, but that makes things harder.
- Try to keep the exposures the same. If you're shooting a pan that starts in dim light and ends in bright, it sometimes helps to meter off a spot somewhere near the center. With most cameras, you can point at the spot in the center, press the shutter button halfway down (a light comes on to say the camera is ready), then move the camera back to wherever you're shooting your image.
- Zoom in a little. You'll have to use more images to cover your scene, but there's a lot less lens warp when you're zoomed in, so it's actually easier to stitch a panorama that was shot that way.
Of course, none of these are absolute rules. If you want to see the difference, try shooting several sequences, and see what you prefer. Most of you are probably using digital cameras, so shooting more images costs nothing extra.
MAKE A CANVAS
Once you get your images uploaded, start gimp and create a new, blank image (either a white or transparent background is fine) big enough to hold the final panorama.
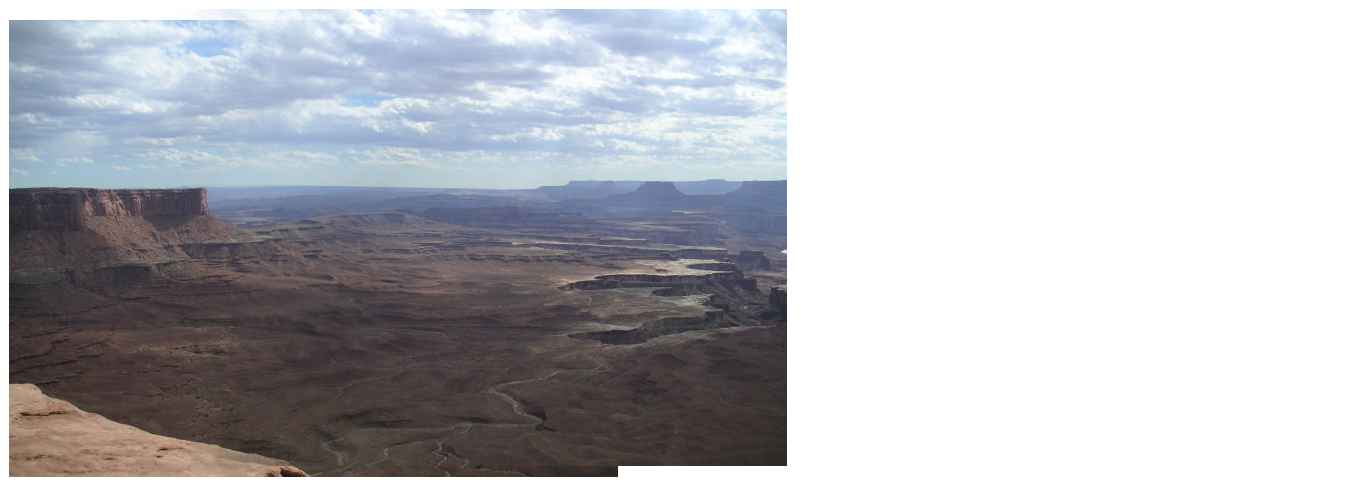
How big is that? Well, first decide what resolution you'll be using. You may or may not want to use the full resolution of your camera. Panoramas are really big, and since GIMP has to keep all the images loaded, plus a bunch of other information, a big panorama can really eat up memory and make the system slow. If you have a lot of memory, or you really need that resolution because you're going to print the resulting panorama at a large size, then go for it. If you don't have much memory and your goal is something to stick on the web, you might want to scale down. For this lesson, I'll be using five images of size 609 x 457, but I'd normally work at one and a half to double that. My original images:

and 81, 82, 83, 84 ... 5 images total.
Once you know your images' width, you can make an estimate of the final canvas size. The final width will be no greater than the sum of all the image widths, in other words, imagewidth * number_of_images. (For this course, I'm assuming you're making a horizontal panorama. If yours is vertical, then swap width and height.)
In reality, though, if you overlapped at 60% of the image width, then the final width is actually imagewidth * number_of_images * .6 plus some slop in case you really overlapped by less than you thought.
The final height will be roughly the same as one image's height, but allow a little slop there, too, since you may have shot some images higher than others. (If you used a tripod, you won't need much slop here.)
I'm going to make a panorama out of these photos: (why the odd numbers? I don't remember. :-) If I leave room for a 30% overlap (though I think I was closer to half, assuming 30% will make the canvas wider so I'll be sure I won't run out of room), the width comes out to 609 * .7 * 5. That comes out 2131.5, but I'll be even more conservative and round up to 2150 (I'll crop it later). I'll use 500 for the height.
Once you know your canvas size, use File->New... to create a new image. You're ready to start loading in your images.
LOAD THE IMAGES
Start with the leftmost image, and open it as a layer in your new image. Gimp 2 has File->Open As Layer. In gimp 1, just open each image, Copy, then Paste into the panorama image. Remember to click the New Layer button in the Layers dialog to make it a real layer, not floating. Use the move tool to move it all the way over to the left, and roughly centered vertically.
Next, open the second image as a new layer, the same way you opened the first; but this time, use the move tool to drag it to the right so that it's approximately where it lines up with the first image. Don't worry about getting it exactly lined up just yet. Go ahead and open all the images as new layers, and drag each one to roughly the right position.
Once you have all the images loaded, in the right order and at approximately the right places, it's a good time to save the image as an xcf. This will preserve all the layers, and the other effects you'll add soon.
Here's a screenshot of my layers lined up:
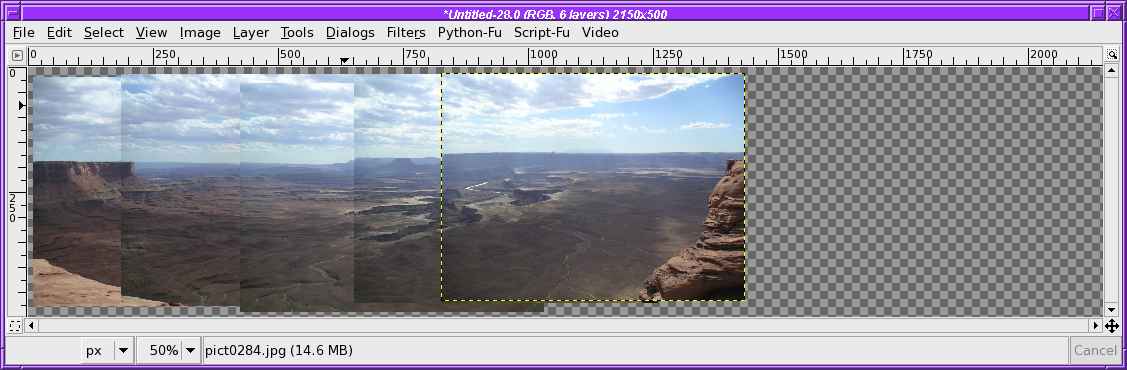
(Obviously I overlapped a lot more than 30%! My canvas is way bigger than it needs to be. But too big is okay. I'll crop it later.)
LINE 'EM UP
Now comes the hard part: lining up all the images accurately.
Start with the first and second images. Toggle visibility off for all the other layers in the Layers dialog, so they don't distract, and zoom in quite a bit: you need to be able to see details.
Now we use a trick. In the Layers dialog, there's a slider marked Opacity. Select the second layer (if gimp gave you a Background layer on your new image, ignore it; "second layer" means the layer for the second image in the panorama) and slide the Opacity slider to about 50%. The image should go translucent: although the second image is on top of the first image, you can see the first through the second where they overlap.
Now that you can see both at once, use the Move tool to move the second layer around until it lines up as well as you can manage. The two layers will not fit perfectly everywhere: even if you kept the camera perfectly level, lens warp will make the images different at the edges. Try to make them fit each other pretty well around the middle of the overlapping area. Don't worry too much about the edges right now.
When you get really close, you'll probably see it seem to "snap" into focus, as ghostly double images become sharp. When you get close, sometimes it helps to put the mouse aside and use the keyboard: when the move tool is selected and a layer is active, you can use the arrow keys to move the layer around by one pixel at a time.
You may find at this point that one image is tilted relative to the other one. GIMP's rotate tool can fix that: rotate just the layer that needs it, usually by only a few degrees. The preview in the rotate tool unfortunately doesn't handle transparency (and earlier versions of gimp don't have a rotate preview at all), so you'll probably have to rotate and undo several times before you get close. Fixing rotations are the hardest and most frustrating part of panoramas. For your first panorama, don't panic if the images are a bit tilted with respect to one another. Try the rotate tool if you want, but if it's too frustrating, just leave it. We may be able to compensate for it later.
Once you're reasonably happy with the alignment of the first two layers, slide layer 2's opacity back to 100%, toggle layer 3's visibility on, select it, slide its opacity to 50%, and line it up with layer 2 the same way you did before. If you have more layers, repeat until they're all lined up.
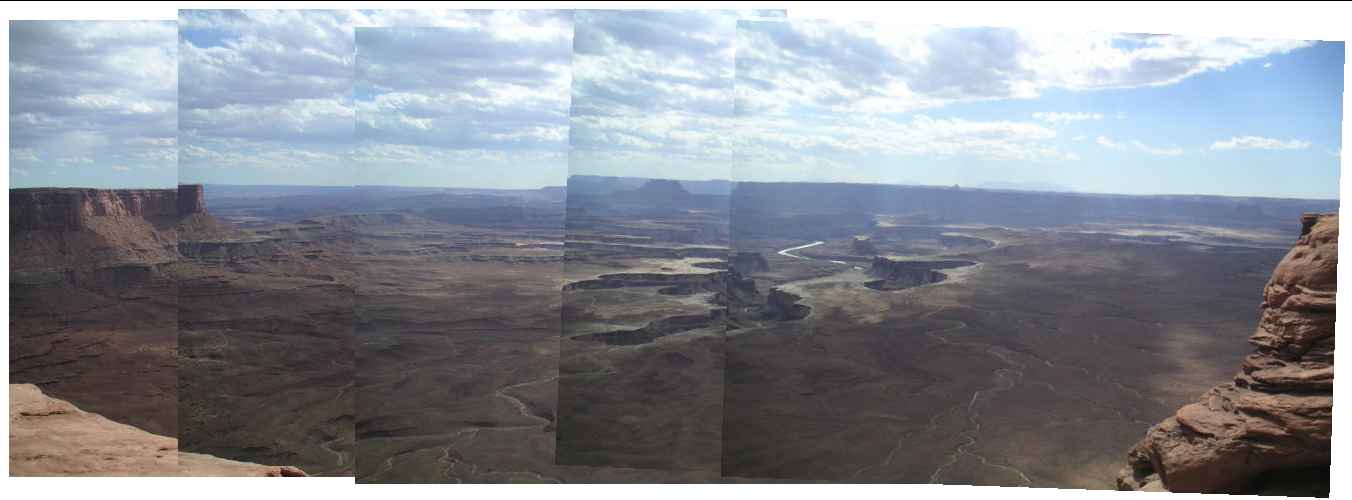
You can see that in my supposedly "lined up" panorama, all kinds of things don't fit. You may also notice that the last two images had to be rotated, because they were so far off. I really did a bad job of shooting this panorama. Good thing I have gimp!
USE LAYER MASKS
To fix those non-fitting edges, Layer Masks, from Lesson 9, are just the ticket.
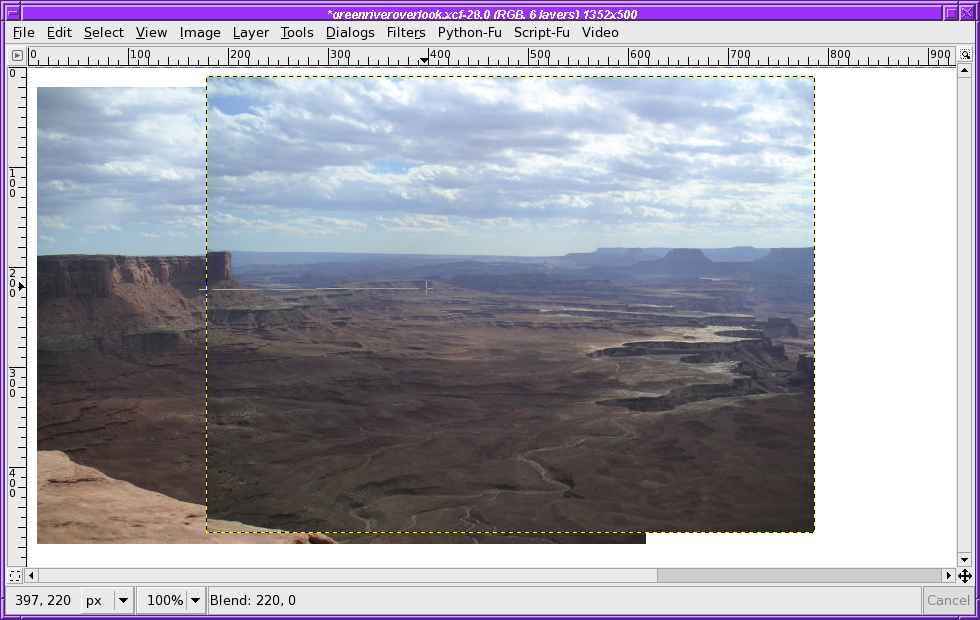
We're going to use the layer mask to make layer 2 fade to transparent near its left edge, where it overlaps with layer 1. Toggle visibility off on all the other layers, so it's easier to see what you're doing. Then select the gradient tool in the toolbox.
We'll draw a gradient on the layer mask, just like we did in Lesson 9. Click on the edge of the second layer, and drag right to approximately where you think the images might line up a little better. If you got really good alignment, then just drag in a little. My images don't match very well, so I'm dragging in a lot.
Screenshot:
At this point, that dotted yellow line at the layer boundary might be getting in the way. You can temporarily turn it off: View->Show Layer Boundary. (In gimp 1, use View->Toggle Selection.) Like Show Selection, this is confusing if you leave it off: you won't be able to see which layer is selected. So remember to turn it back on again.
It's also confusing to have a layer mask selected. When you're done setting up your gradient, click on the layer preview next to the layer mask, so that the mask isn't selected any more. Otherwise, gimp will give you weird complaints when you try to save as jpg, and you'll get confused (at least, I do) when you try to do anything with that layer.
Here's my layers dialog now:
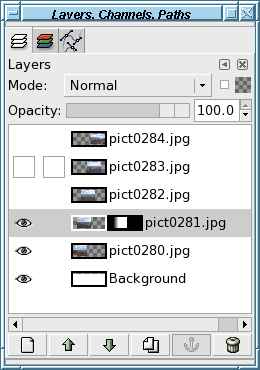
Notice that the layer is selected, not the layer mask; and notice that the layer mask preview is a little fuzzy on the left side, where it fades to black.
With the first layer mask finished, my first two images look like this:
Compare that to what they looked like before (in the gradient screen shot). Quite a difference!
Now toggle the next layer visible again, add a mask, and draw a gradient. Repeat until you've added a mask for every layer but the first one. Here's what my image looks like now:
TURN OFF BAD IMAGES
We're almost done. You have a pretty decent panorama at this point. But there may still be a few areas that bug you.
Sometimes, at this point, I discover that one of my images just isn't as good as the rest. Maybe it's not focused well, or too dark, or too rotated. Sometimes just toggling off one layer makes the image look a lot better. Don't feel like you have to use every image: that's one reason to use a lot of overlap when you shoot, so you can throw away bad images. In my case, I found that turning layer 4 off improved the image. I didn't delete that layer: it's still stored in the .xcf (don't forget to save the xcf file frequently, so you don't lose any of your hard work) in case I change my mind later, but visibility is turned off. It takes up extra space (xcf files of panoramas with lots of images can be quite large) but it's worth it.
PAINT OUT BAD AREAS
But even if you turn off some images, you may still have areas that just aren't quite right. In my image, there's some confusion where the drainage comes in from the lower left, where I can see two pieces overlapping. Also, I don't have a sharp edge on the right side of the center canyon right near the middle of the image. Sometimes you can keep making bigger or smaller gradients until you get it right, or angle the gradients (they don't have to be exactly horizontal); but if that doesn't work, there's a better way.
Remember that a layer mask is just a white image that you can draw on in black. Anywhere you draw black, the upper image will become transparent: effectively, it will be erased and the lower image will take precedence.
So make sure your foreground color is black, and choose a drawing tool (I'll use paintbrush) and a large fuzzy brush. Then figure out which layer is the one with the offending areas you want to make transparent. Click on that layer mask in the Layers dialog to select it. Then paint!
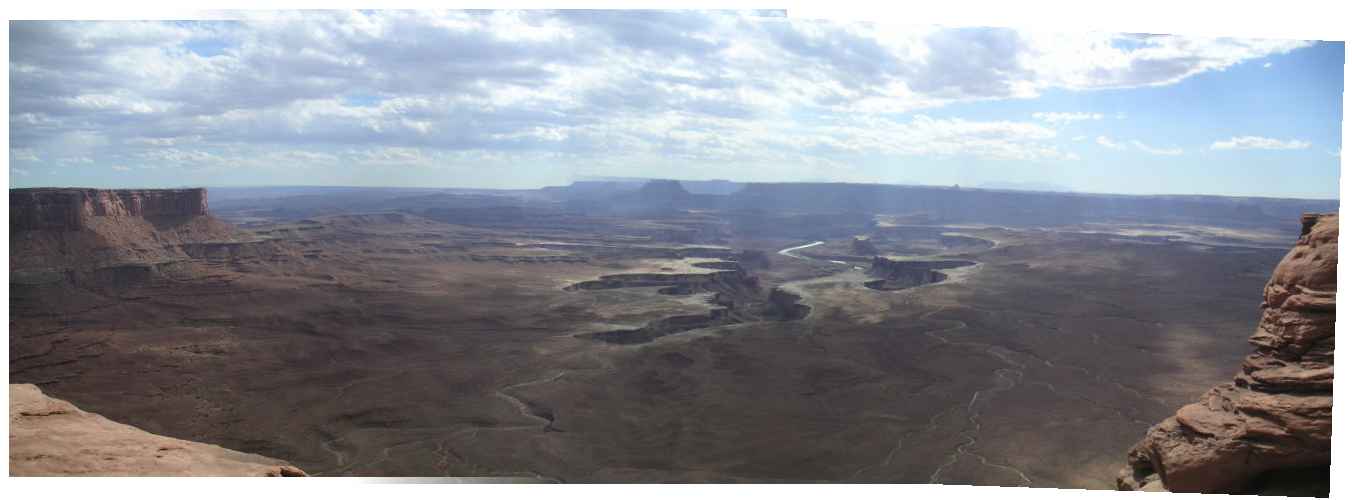
After painting out those bad areas, here's my final panorama:
SHAMELESS PLUG
If you make a lot of panoramas and get tired of the "calculate canvas size and create layer masks" steps, you can use my gimp plug-in, "Pandora", to automate those parts. It's at